Showing posts with label Bike. Show all posts

Friday, 16 December 2011

Do bikes know it's Christmas time at all?

So my bike has destroyed a throttle cable. It goes without saying that I'm not impressed. It couldn't have happened at a worse time either, well unless you count it going whilst I was away from home... or if I had a job to get to or something. Whatever. I'm still battling the christmas strain on the postal service to get a new cable before new year (as I live in the sticks and nowhere within 150 miles even stocks one). Sadly, this isn't the only issue, as a panel was cracked in the process of getting the bike to a point where I could take the tank off to actually check out the carb end of the cable. In absolute terms, it's no biggie, a bit of fibreglass here, some filler there, a whole mess of sanding and painting etc etc. But in this context all it's done is add insult to injury. 

The only silver lining is remembering back a couple of years ago when something like this would have set me mewling and shitting myself. This was something that only occurred to me after I had the bike in bits. It's quite nice to be able to think how far you've come along.

Wednesday, 23 November 2011

First Impressions and Fitting the Skidmarx GPz-style Nosecone

Well, it took nigh on six weeks to arrive, but finally my GPz Nosecone (or bikini/cockpit fairing) arrived. First impressions were mixed. Packaging wise, it was reasonably well packed in a roomy box, with the fairing, screen and mounting kit all being supplied in separate bags. Both the fairing and screen are reasonably thick and feel quite sturdy. The only issue I had was that the inside of the fairing was a bit rough and I cut myself a couple of times on the rough fiberglass. The universal fixing kit was straightforward to assemble and was again made sturdily. None of the brackets felt at all flimsy. 


The instructions however, left a little to be desired as they were clearly a handdrawn diagram of the fixing kit that had been photocopied. As such, it was hard to really work out anything beyond the basics. Still, as I said, the fixing kit was reasonably simple to work out and the whole assembly is hardly rocket science.


So, overall, the nosecone seemed well worth the £50-odd pounds I paid for it, it may be a bit rough on the inside, but it's robust and the outside is well finished, The sculpt is good too, to the point where it looks like it was molded from a Z1100R nosecone. Obviously, there's the matter of the six weeks I had to wait for it, but I get the feeling that was an error on the part of the place I ordered from, rather than being typical.

Now, that's the boring standard stuff out of the way. As is always the case with these things, I ran into a couple of issues fitting the nosecone to my bike. The most pressing being the fact that the 'scoops' that cover the radiator from the sides were hitting the fairing when it was trial fitted on all but the most minimal amount of steering lock. Since the scoops are one of my favorite pieces of styling on the bike, they weren't going anywhere.

As the scoops were staying, the fairing itself needed to be modified. Working with my Dad, we made up a template using the fairing's existing curvature, to keep it looking as standard as possible, and I got to work with the Dremel. I used a cutting wheel to chop down the lower part of the fairing, using the template to keep it from looking like a hack job. With one side done, the template was transferred over. By measuring the distance from the template edge to the end of the fairing (in three different places along the template) the first time, it was a simple case of making the measurements match on the other side, to keep things symmetrical. Once I was finished cutting (and the fiberglass dust had dispersed) I got busy sanding the burr off the edges. The job wasn't perfect, but then this was my first time reshaping a body panel and I'm pretty impressed with how it came out. It doesn't look like a total hack job, and once an edging trim goes on, it'll look even better. 

That's before it was fully sanded, there is some discolouration to the gelcoat where I made the cut.

After that, assembly went pretty well. Holes were marked and drilled and the fairing was united with its mounting kit. My bike's idiosyncrasies weren't done with though. Good thing, too. It's boring when things just bolt together! The way the different bolts involved sat, it was impossible to fit the fairing with the headlight in place. You need to be able to reach inside the bowl to do-up the mounting bolts (as used by the fairing) and once the fairing is in place it is impossible to put the front of the headlight back on. There seems to be a provision to get around this on some of the bracketry, but in practice, once every is in place and tightened up, it would be impossible to gain access to the bolts needed. Still, this problem was easily solved by cutting the ends from two of the brackets, changing the slotted holes going the headlight into more of an open fork arrangement. This lets the fairing be mounted by backing off, rather than totally removing, the headlight bolts. 


With this done, all that was needed was to move the bike's indicators out a little so that they stuck past the fairing and it was finished.


Well, apart from one last little finishing touch to tie it in.


Friday, 7 October 2011

RC30 Complete

This is my completed Tamiya VFR750R RC30 model kit. I’m not totally happy with it, but perfectionist as I am; I have to admit that it isn’t too bad for my first motorcycle scale model kit. I intend to review the kit as a kit, but first I’d like to mention some of my thoughts in relation to my specific building experience. 


I was really impressed with the quality of the model and the advantages this had in how easy it went together. I only had moulding defect on the entire model and that was just an engine mounting hole in the frame that hadn’t been drilled fully through. All it took to rectify was two seconds with a tiny drill on the dremel. Compared to my experiences with both military scale models and wargaming miniatures, this was a real breath of fresh air. Beyond that though, all the parts meshed together perfectly without trimming (beyond removing moulding lines), reshaping, or using putty to fill gaps.
Another nice touch comes from the clear fairing panels; these mean that you can see your beautifully painted components without them being covered by a fairing. This really appeals to me as someone who spends as much time painting the engine as the fairing or tank. 


Less impressive was the heavy use of decals. The RC30, as a world superbikes homologation bike, only came in the red, white and blue HRC colours. As a perfectionist/bike nerd, I had to have my model in said correct colours. Tamiya seem to have understood that people would want to do this, but that it’s a bit of a stretch to do a three-tone paintjob on a 1/12th scale body panel (with gold pinstripes between the colours). So instead, there are large red decals so you only need to paint white and blue onto the panels. I had real problems with this; the decals wouldn’t stay on the contours of the panels once they’d dried out, even when I had them flat with no bubbles or wrinkles. Still, apart from that, I really like the abundance of logos as points of detail, even down to the dial faces of the clocks and the tyre pressure info sticker on the chain guard.

Overall, it’s been a fun experience and really highlighted for me the different skills needed for military, fantasy or wargaming modelling as opposed to scale modelling showroom appearance vehicles. It’s been (at the risk of sounding corny) really educational, as I’ve learned things as I’ve gone along that I’ll be able to take into my next project, namely that it’s worth just priming entire sprues to begin with (not me being dense, I was worried about the areas that wouldn’t be primed when I cut the pieces from the sprue) and that the airbrush is worth its weight in gold for the smooth, even finish it can give. Still, as fun as it was, I think I need to do a few warhammer models to cleanse the palette, since I can run wild, before I can dive back into doing another bike.  


Friday, 30 September 2011

Regular Maintenance: Serious Business.


With it being unseasonably warm the last few days, I took the opportunity to get some bike based housekeeping (bike-keeping?) done. Namely replacing the air filter, which I checked about 5000 miles ago and decided that there was about 2000 miles worth of life left in it, and changing the oil. Not the most glamorous of jobs, but they needed doing, and given the weather I needed to do something other than jobseeking (boo), sitting on my arse writing, or sitting on said arse doing/watching/playing something to write about later. Oh irony!

I’m still trying to get into the habit of taking pictures of jobs as I go along, so even with this being an easy job, I got a bit snap-happy. Brandishing a digital camera was a bit at odds with the Fred Dibnah Business Suit™ (a must for any serious work), but I still got a little too into it, taking far too many pictures for such a simple task. Many of these pictures will be interspersed into this just so I wasn’t wasting my time.

While the bike was running to warm and thin the oil, I got busy with the first challenge to be overcome: constructing my oil tray. Some people will buy a purpose made drain tray for upwards of £20, these people are decadent bourgeois fools. Others will use some sort of scummy old bowl, paint tray, or the like. This is also a stupid idea, but for practical reasons: you want a clean drip tray so you can see if there’s anything floating in the oil you’re draining. Things like bits of metal can tell you a lot about the health of the inside of your bike’s engine. Protip: bits of metal in your oil aren’t a good thing.  


Anyway, crafting the tray was a doddle with my amazing craftsman skills. Yeah... yeah. It is a just 6 pint milk carton with a hole in it. Still, even if I can’t claim that it was my idea, it is ingenious. Empty cartons always available and the screw cap lets you drain it out into a suitable container for storage with ease (more on that later).
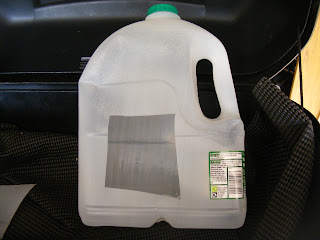
Oil tray reporting for duty!

One more step it’s a good idea to take before removing the drain plug is to remove the oil filler. So I did (it lets atmospheric pressure act to help drain the oil quicker). This done, I finally got down to business and removed the sump plug. Remembering to put the drain pan in place under the engine first, I didn’t want the garage floor looking like the aftermath of the Exxon Valdez.

Here we go.
As I left the oil to drain, I cleaned up the sump plug and replaced the crush washer ready for reinstallation. As the name hints, the washer crushes down as the plug is tightened up, providing a good oil seal. For this reason, you’re meant to change the crush washer each time you change the oil. Few people do though.


After this, since the oil was still going to be draining for a while, I got on with replacing the air filter: efficiency and all that. Changing the air filter was a simple enough job. Just three bolts retaining bolts and the cover was off. The old filter itself was even easier: it just pulled straight out. The aperture was clean so it was just case of pushing the new filter in and replacing the cover. All too easy for someone of my mechanical skill :P . 

As a side point, since the threads for the cover were metal set into plastic, I decided to apply copper grease to the retaining bolts before replacing them. Copper grease in general is used to help prevent corrosion from fusing the bolt into the nut or thread around it. This helps to stop bolts seizing and then shearing when you attempt to remove them. In this case, I envisioned the bolts fusing into the embedded threads of the air box and these metal threads then ripping free of the plastic next time I had to remove the bolts.
The old air filter, check out the dirt.

Additionally, a little copper grease on bolts was apparently a sign of a well looked after bike in the old days and old bikers now get annoyed by people like me who use it where it may not be strictly necessary. Honestly this just amuses me. So long as it isn’t going to cause contamination, like using it on any bolt that goes into the innards of the engine itself, I don’t see the problem. Even if a bolt was never going to seize anyway, putting a little copper grease on it isn’t going to hurt.

The new, much better.
With that over with, the oil had about fully drained. I waited until the final drops finished and replaced the sump plug. Doing this involved breaking out the 'mighty' torque wrench. Some see the torque wrench as the physical manifestation of OCD. This has a little truth to it, some things can be safely tightened by feel and using the torque wrench just slows things down. However, I personally find the torque wrench to be invaluable for giving peace of mind by ensuring that vital bolts, such as the yoke clamps for the fork legs, are as tight as they were when they left the factory. In the case of the sump plug, using a torque wrench is important as aluminium sumps are vulnerable to cracking if the plug is overtightened. Overtightening is a real possibility too, as the sump plug is often very tight before removal. This is because the endless heating and cooling cycles of the engine make for constant expansion and contraction of the metal threads, which over time leads to them becoming more tightly interlocked than they started out. The torque setting for my plug is 35nm which equates to about 25 ftlb (my torque wrench doesn’t do metric) which barely feels like anything at all; hence the danger of overtightening from the more nervous home mechanic.
Behold, the magnificence that is the torque wrench.

This done, it was finally time to refill my bike with beautiful golden nectar. Just take a look at the colour difference between the new oil and the old (see the bottom). It’s a misconception that engine oil is/should be black. As per the figure listed in Haynes, I measured out, using a measuring jug and filling one litre at a time, 2.9L of (only the best) Halfords motorcycle oil. This hurdle overcome, I replaced the filler cap and ran the engine back to temperature. A quick check of the dipstick told me that the oil level was... just over the minimum mark. This isn’t totally uncommon. Even if you measure out the correct amount, engine oil has a reasonably high viscosity; you never get it all into the engine. Some always remains in the measuring jug or inside the funnel, and that’s not taking into account spillage. Four more cycles of topping up by 100ml, running the engine, then checking the level were needed before the oil level was right.  

With all the fun over, all that remained was getting the oil from the master-crafted drip tray into an appropriate receptacle ready for transport to an approved disposal site. As I stated before, this was a simple job thanks to the screw cap. All I had to do was place the tray on the workbench, put the masterwork funnel into an empty oil container then remove the screw top. This let the oil flow out into the appropriate receptacle. The appropriate receptacle will now be responsibly dealt with by leaving it in the garage for a few months until nobody can remember where said appropriate receptacle full of used oil has gone. The tray just went in the bin. 

Feeling satisfied of a job well done. I indulged in a dinner (lunch for devious foreigns) of champions. There is no better way to finish a job. 


So there it is. A small job written long. As always, it felt good to finish something and be able to  see the fruits of my labours. Someday I hope to get paid to have that feeling. Until then I’ll just keep writing to get it, and pursuing projects... which I can then write about.


Addendum: Since I couldn't get it to read well with all the pictures interspersed with the text. Here are further reference pics:

A used crush washer. Notice the deformation.


The new air filter.

The air filter housing. Notice the embedded metal threaded holes.

Copper grease applied to a bolt. Purdy.

Old black oil vs new golden nectar.


Wednesday, 21 September 2011

Switchgear Success.

As much as all this writing is fun it does leave a little to be desired in terms of physical results. Thankfully, my trip last week not only gave me something to write about, it also gave me something that needed fixing, namely my bike's r/h switchgear pod which started spinning on the bar everytime I used the throttle. The only reason that the throttle worked at all was because the metal throttle cable sheath elbows coming out of the bottom of the switch housing could be wedged against the bottom of the brake lever clamp.

This setup was safe enough for coming home from Leicester (I had no choice) but not really for anything else. Luckily since the housing had never been totally right, I had bought a CBR600 unit to replace it. Unluckily, the CBR wiring used a totally different harness and different coloured cables to my CB500. So began the process of checking, double checking and logging which coloured wire went to each individual switch contact.

The pre-graft. I also hate phone cameras
With the wire colours safely noted, I took the plunge and cut the harnesses off of the ends of each switchgear's wire bundle and began the tedious process of soldering the appropriate wires together. I may maintain that bike wiring as a whole is a piece of cake, but I still hate soldering, the stupid stuff never flows into the joints like it should for me. Still, it didn't take too long, about 40 minutes including the time needed to refill my portable soldering torch a couple of times. I made sure the joints were all pretty by covering them in heatshrink before taping the lot up. Many people look down on using insulting tape, but I have no problem in using it to make an outer sheath for a bundle of wires that would otherwise be hanging loose. I wouldn't use it to cover the join on every individual wire though, that would just be sloppy! It all turned out fine and works perfectly (of course) but it always amazes me that no matter how confident I am of a repair, I'm always nervous when I try out some repaired or modified electrics for the first time. 

Seeing as I was doing work that took the bike out of action anyway, I also used this opportunity to take the bars off and drill a new locating hole for the pin on the CBR switchgear. My bike has Renthal aftermarket bars as the originals were too low. Honda switchgear uses a locating pin to stop it from spinning on the bar. This is especially important for the right side when the throttle is applied (it was this pin that escaped from my switchgear on the trip). However, when I got the new bars they didn't have the hole drilled for the switchgear. Long story short, I was in a hurry to get the job done and drilled the hole in the wrong place, putting the switchgear at a weird angle. This time around I trial fitted, measured and marked like a proper human being and surprise, surprise, the switchgear now sits how it should have when I first fitted the bars over 14 months ago!

It feels good to do something practical and productive, even if they were very minor jobs.

Saturday, 17 September 2011

The Little Bike That Could.

 A few days ago I made a mid-length journey to a job interview and stayed over with a friend. It took a fair whack of time and was a little more interesting than the usual tedium of my life. So I decided to see if I could get a piece of writing out of it. The following is my first attempt at something approaching a stream of consciousness, the thoughts and feelings are all pretty real and based upon how I felt in the moment, as such they may not be absolutely factually accurate, but they are true to me.  Without further ado: